REST (Representational State Transfer) is a system architecture that defines the set of methods to access the web services. The main goal of REST API is to create a system that can be used by different applications.
The REST API are created with CRUD (Create, Read, Update, Delete) operations. The REST API is consumed by making HTTP request (GET, POST, PUT or DELETE) from the client side. The API is implemented in way to return response in JSON or XML or any other format.
So if you’re working on application to work on different devices like Desktop, mobile etc, then you can create REST API with required operations to be accessed by different application like web application and Mobile application.
Also, read:
In this tutorial you will learn how Create Simple RESTful API with PHP and MySQL. We will implement REST API with CRUD operations to create items, read items, update items and delete items.
We will cover this tutorial step by step with live example to create RESTFul API to perform CRUD (Create, Read, Update, Delete) operations and consume REST API with HTTP request (GET, POST, PUT or DELETE) to play with items data.
So let’s start the coding. We will have following file structure for our REST API example.
- rest-api
- config
- Database.php
- Class
- Items.php
- items
- create.php
- read.php
- update.php
- delete.php
- .htaccess
- config
Step1: Create MySQL Database Table
As we will create REST API with CRUD operations, so first we will create MySQL table items to store items details.
CREATE TABLE `items` (
  `id` int(11) NOT NULL,
  `name` varchar(256) NOT NULL,
  `description` text NOT NULL,
  `price` int(255) NOT NULL,
  `category_id` int(11) NOT NULL,
  `created` datetime NOT NULL,
  `modified` timestamp NOT NULL DEFAULT CURRENT_TIMESTAMP
) ENGINE=MyISAM DEFAULT CHARSET=utf8;
We will also insert few records to perform operations.
INSERT INTO `items` (`id`, `name`, `description`, `price`, `category_id`, `created`, `modified`) VALUES
(1, 'LG P880 4X HD', 'My first awesome phone!', 336, 3, '2014-06-01 01:12:26', '2014-05-31 17:42:26'),
(2, 'Google Nexus 4', 'The most awesome phone of 2013!', 299, 2, '2014-06-01 01:12:26', '2014-05-31 17:42:26'),
(3, 'Samsung Galaxy S4', 'How about no?', 600, 3, '2014-06-01 01:12:26', '2014-05-31 17:42:26'),
(6, 'Bench Shirt', 'The best shirt!', 29, 1, '2014-06-01 01:12:26', '2014-05-31 02:42:21'),
(7, 'Lenovo Laptop', 'My business partner.', 399, 2, '2014-06-01 01:13:45', '2014-05-31 02:43:39'),
(8, 'Samsung Galaxy Tab 10.1', 'Good tablet.', 259, 2, '2014-06-01 01:14:13', '2014-05-31 02:44:08'),
(9, 'Spalding Watch', 'My sports watch.', 199, 1, '2014-06-01 01:18:36', '2014-05-31 02:48:31'),
(10, 'Sony Smart Watch', 'The coolest smart watch!', 300, 2, '2014-06-06 17:10:01', '2014-06-05 18:39:51'),
(11, 'Huawei Y300', 'For testing purposes.', 100, 2, '2014-06-06 17:11:04', '2014-06-05 18:40:54'),
(12, 'Abercrombie Lake Arnold Shirt', 'Perfect as gift!', 60, 1, '2014-06-06 17:12:21', '2014-06-05 18:42:11'),
(13, 'Abercrombie Allen Brook Shirt', 'Cool red shirt!', 70, 1, '2014-06-06 17:12:59', '2014-06-05 18:42:49'),
(26, 'Another product', 'Awesome product!', 555, 2, '2014-11-22 19:07:34', '2014-11-21 21:37:34'),
(28, 'Wallet', 'You can absolutely use this one!', 799, 6, '2014-12-04 21:12:03', '2014-12-03 23:42:03'),
(31, 'Amanda Waller Shirt', 'New awesome shirt!', 333, 1, '2014-12-13 00:52:54', '2014-12-12 03:22:54'),
(42, 'Nike Shoes for Men', 'Nike Shoes', 12999, 3, '2015-12-12 06:47:08', '2015-12-12 07:17:08'),
(48, 'Bristol Shoes', 'Awesome shoes.', 999, 5, '2016-01-08 06:36:37', '2016-01-08 07:06:37'),
(60, 'Rolex Watch', 'Luxury watch.', 25000, 1, '2016-01-11 15:46:02', '2016-01-11 16:16:02');
Step2: Create Database Connection
In directory config, we will create a class Database.php to make connection to MySQL database.
<?php
class Database{

	private $host  = 'localhost';
    private $user  = 'root';
    private $password   = "";
    private $database  = "phpzag_demo";

    public function getConnection(){
		$conn = new mysqli($this->host, $this->user, $this->password, $this->database);
		if($conn->connect_error){
			die("Error failed to connect to MySQL: " . $conn->connect_error);
		} else {
			return $conn;
		}
    }
}
?>
Step3: Implement Create Items
In directory items, we will create a file create.php and implement items create functionality to insert new record into database. The API will accept HTTP POST values to create record. We will create object of class Items.php and call method create() to save record.
<?php
header("Access-Control-Allow-Origin: *");
header("Content-Type: application/json; charset=UTF-8");
header("Access-Control-Allow-Methods: POST");
header("Access-Control-Max-Age: 3600");
header("Access-Control-Allow-Headers: Content-Type, Access-Control-Allow-Headers, Authorization, X-Requested-With");

include_once '../config/Database.php';
include_once '../class/Items.php';

$database = new Database();
$db = $database->getConnection();

$items = new Items($db);

$data = json_decode(file_get_contents("php://input"));

if(!empty($data->name) && !empty($data->description) &&
!empty($data->price) && !empty($data->category_id) &&
!empty($data->created)){

    $items->name = $data->name;
    $items->description = $data->description;
    $items->price = $data->price;
    $items->category_id = $data->category_id;
    $items->created = date('Y-m-d H:i:s');

    if($items->create()){
        http_response_code(201);
        echo json_encode(array("message" => "Item was created."));
    } else{
        http_response_code(503);
        echo json_encode(array("message" => "Unable to create item."));
    }
}else{
    http_response_code(400);
    echo json_encode(array("message" => "Unable to create item. Data is incomplete."));
}
?>
In class Items.php, we will implement method create() to insert POST values to database table.
<?php
function create(){

	$stmt = $this->conn->prepare("
		INSERT INTO ".$this->itemsTable."(`name`, `description`, `price`, `category_id`, `created`)
		VALUES(?,?,?,?,?)");

	$this->name = htmlspecialchars(strip_tags($this->name));
	$this->description = htmlspecialchars(strip_tags($this->description));
	$this->price = htmlspecialchars(strip_tags($this->price));
	$this->category_id = htmlspecialchars(strip_tags($this->category_id));
	$this->created = htmlspecialchars(strip_tags($this->created));


	$stmt->bind_param("ssiis", $this->name, $this->description, $this->price, $this->category_id, $this->created);

	if($stmt->execute()){
		return true;
	}

	return false;
}
?>
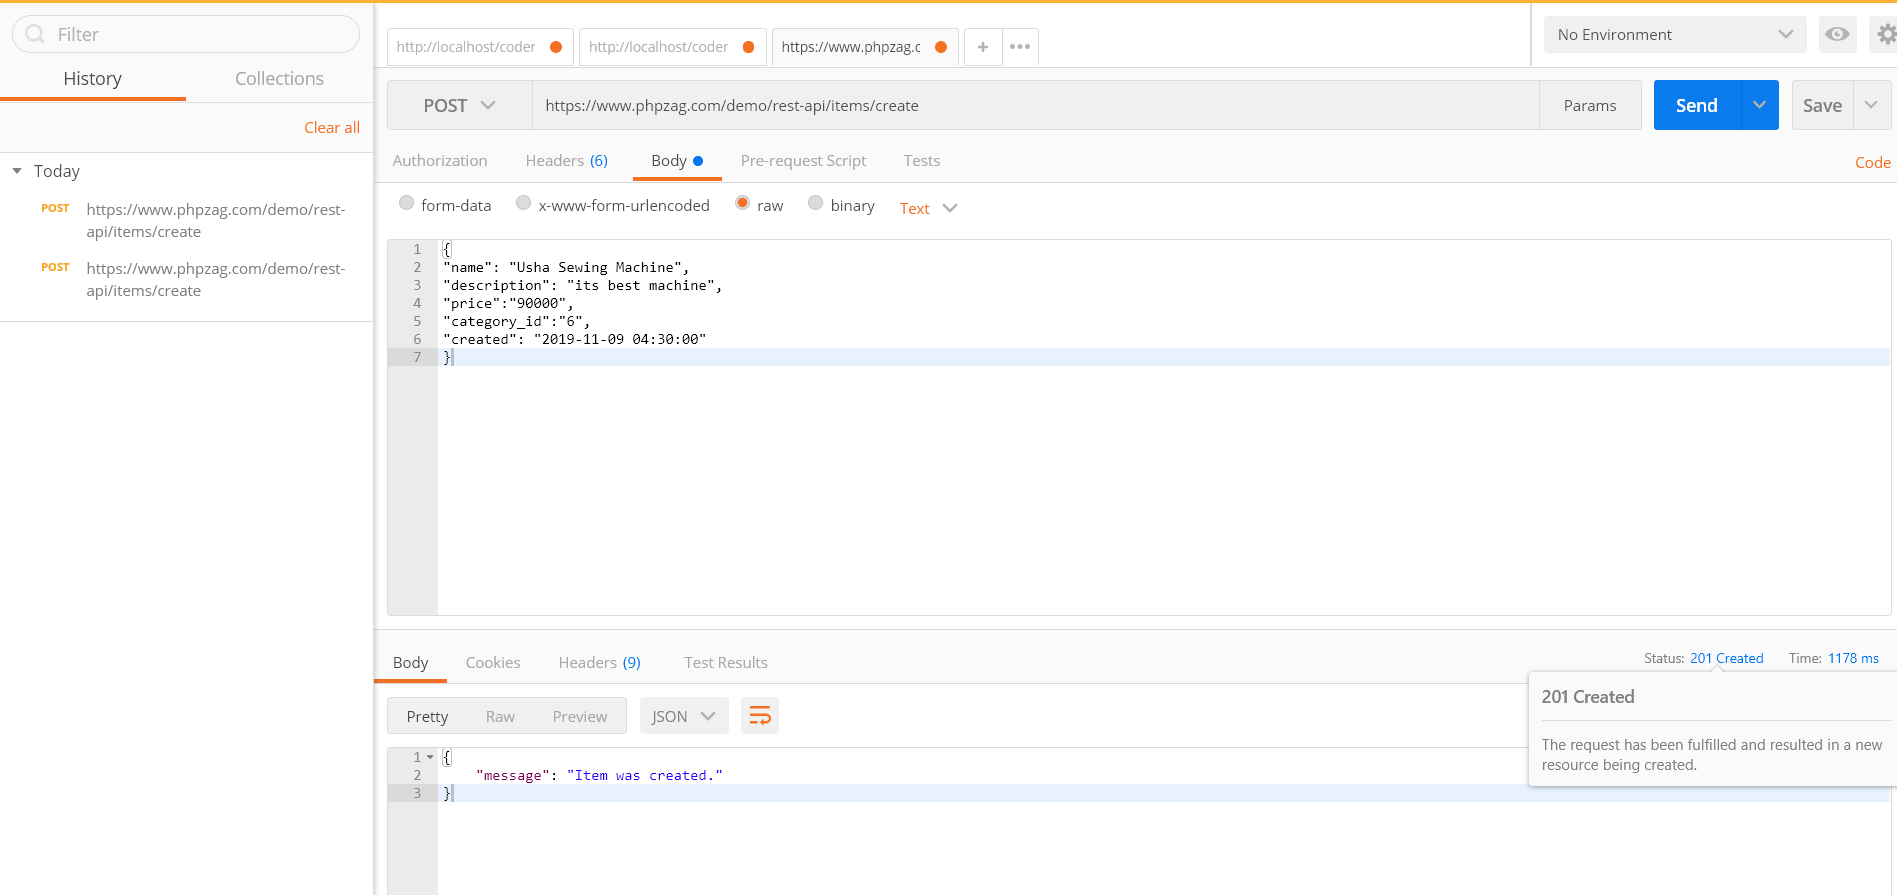
We will test the Create URL example from our REST API using following URL with POSTMAN App.
https://www.phpzag.com/demo/rest-api/items/create
We will POST the following JSON data values to create a new item record.
{
"name": "Usha Sewing Machine",
"description": "its best machine",
"price":"90000",
"category_id":"6",
"created": "2019-11-09 04:30:00"
}
Step4: Implement Read Items
In directory items, we will create PHP file read.php and implement items read functionality. We will handle items read functionality with HTTP GET method to get all items or specific item. We will create object of class Items.php and call method read() and return response data in JSON format.
<?php
header("Access-Control-Allow-Origin: *");
header("Content-Type: application/json; charset=UTF-8");

include_once '../config/Database.php';
include_once '../class/Items.php';

$database = new Database();
$db = $database->getConnection();

$items = new Items($db);

$items->id = (isset($_GET['id']) && $_GET['id']) ? $_GET['id'] : '0';

$result = $items->read();

if($result->num_rows > 0){
    $itemRecords=array();
    $itemRecords["items"]=array();
	while ($item = $result->fetch_assoc()) {
        extract($item);
        $itemDetails=array(
            "id" => $id,
            "name" => $name,
            "description" => $description,
			"price" => $price,
            "category_id" => $category_id,
			"created" => $created,
            "modified" => $modified
        );
       array_push($itemRecords["items"], $itemDetails);
    }
    http_response_code(200);
    echo json_encode($itemRecords);
}else{
    http_response_code(404);
    echo json_encode(
        array("message" => "No item found.")
    );
}
?>
In class Items.php, we will implement method read() to read items from database.
<?php
function read(){
	if($this->id) {
		$stmt = $this->conn->prepare("SELECT * FROM ".$this->itemsTable." WHERE id = ?");
		$stmt->bind_param("i", $this->id);
	} else {
		$stmt = $this->conn->prepare("SELECT * FROM ".$this->itemsTable);
	}
	$stmt->execute();
	$result = $stmt->get_result();
	return $result;
}
?>
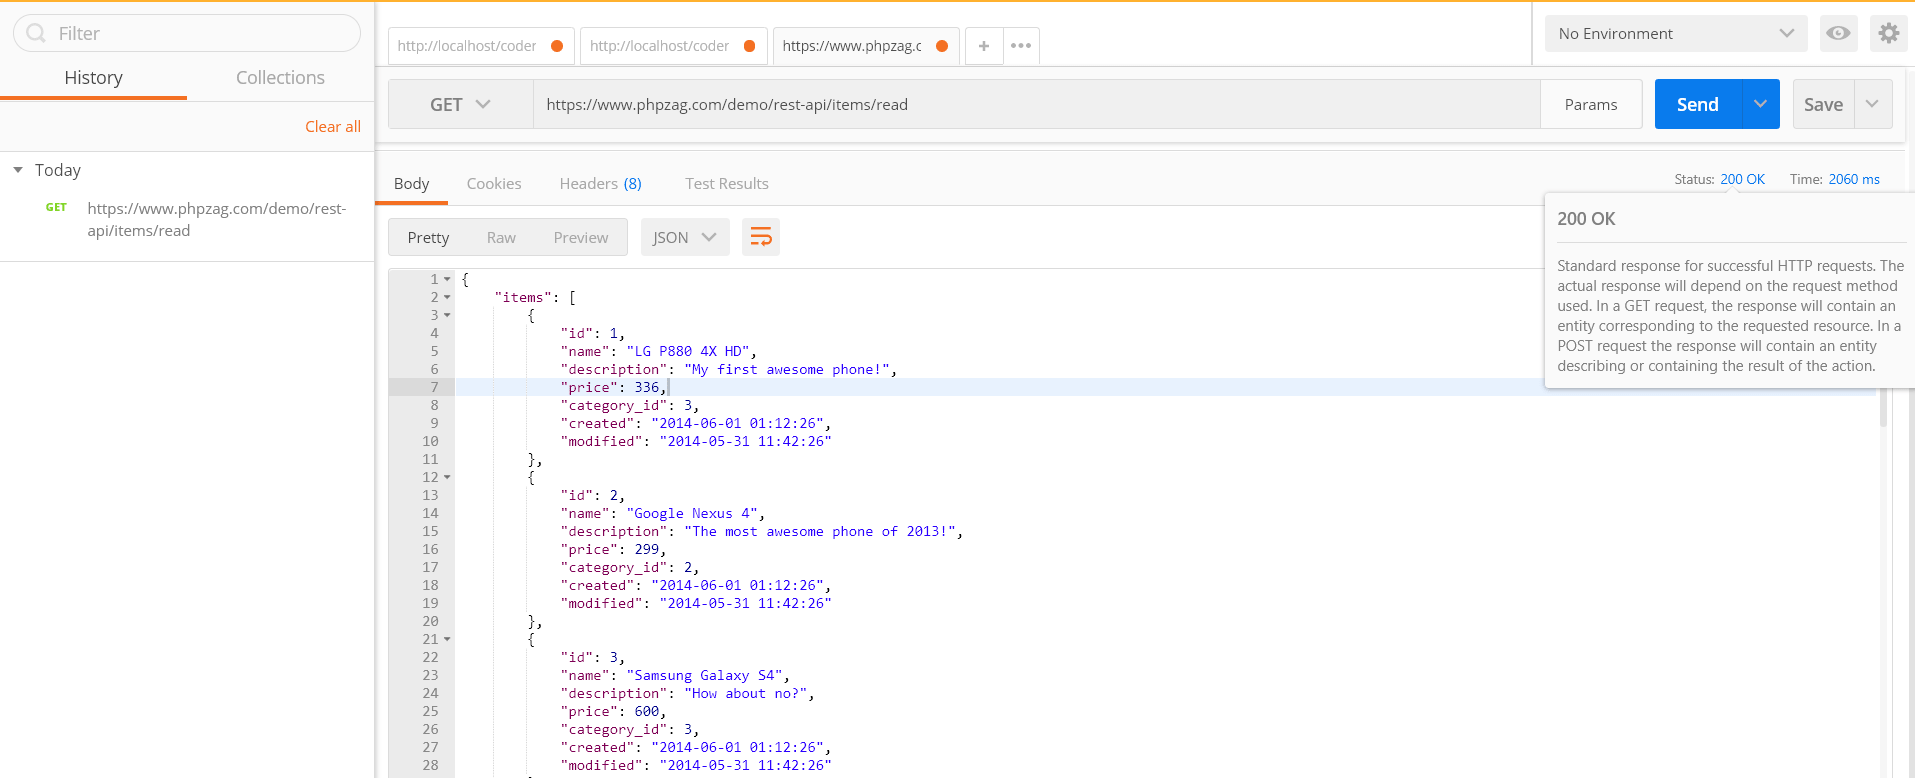
We will test the Read URL example from our REST API using following URL with POSTMAN App.
https://www.phpzag.com/demo/rest-api/items/read
The above Read URL will return all item record in JSON data format. We need to pass specific item id to get that item record.
Step5: Implement Update Items
In directory items, we will create PHP file update.php and implement items update functionality with HTTP PUT method. We will create object of class Items.php and call method update() to update the items details.
<?php
header("Access-Control-Allow-Origin: *");
header("Content-Type: application/json; charset=UTF-8");
header("Access-Control-Allow-Methods: POST");
header("Access-Control-Max-Age: 3600");
header("Access-Control-Allow-Headers: Content-Type, Access-Control-Allow-Headers, Authorization, X-Requested-With");

include_once '../config/Database.php';
include_once '../class/Items.php';

$database = new Database();
$db = $database->getConnection();

$items = new Items($db);

$data = json_decode(file_get_contents("php://input"));

if(!empty($data->id) && !empty($data->name) &&
!empty($data->description) && !empty($data->price) &&
!empty($data->category_id)){

	$items->id = $data->id;
	$items->name = $data->name;
    $items->description = $data->description;
    $items->price = $data->price;
    $items->category_id = $data->category_id;
    $items->created = date('Y-m-d H:i:s');


	if($items->update()){
		http_response_code(200);
		echo json_encode(array("message" => "Item was updated."));
	}else{
		http_response_code(503);
		echo json_encode(array("message" => "Unable to update items."));
	}

} else {
	http_response_code(400);
    echo json_encode(array("message" => "Unable to update items. Data is incomplete."));
}
?>
In class Items.php, we will implement method update() to update item detail to the database table.
<?php
function update(){

	$stmt = $this->conn->prepare("
		UPDATE ".$this->itemsTable."
		SET name= ?, description = ?, price = ?, category_id = ?, created = ?
		WHERE id = ?");

	$this->id = htmlspecialchars(strip_tags($this->id));
	$this->name = htmlspecialchars(strip_tags($this->name));
	$this->description = htmlspecialchars(strip_tags($this->description));
	$this->price = htmlspecialchars(strip_tags($this->price));
	$this->category_id = htmlspecialchars(strip_tags($this->category_id));
	$this->created = htmlspecialchars(strip_tags($this->created));

	$stmt->bind_param("ssiisi", $this->name, $this->description, $this->price, $this->category_id, $this->created, $this->id);

	if($stmt->execute()){
		return true;
	}

	return false;
}
?>
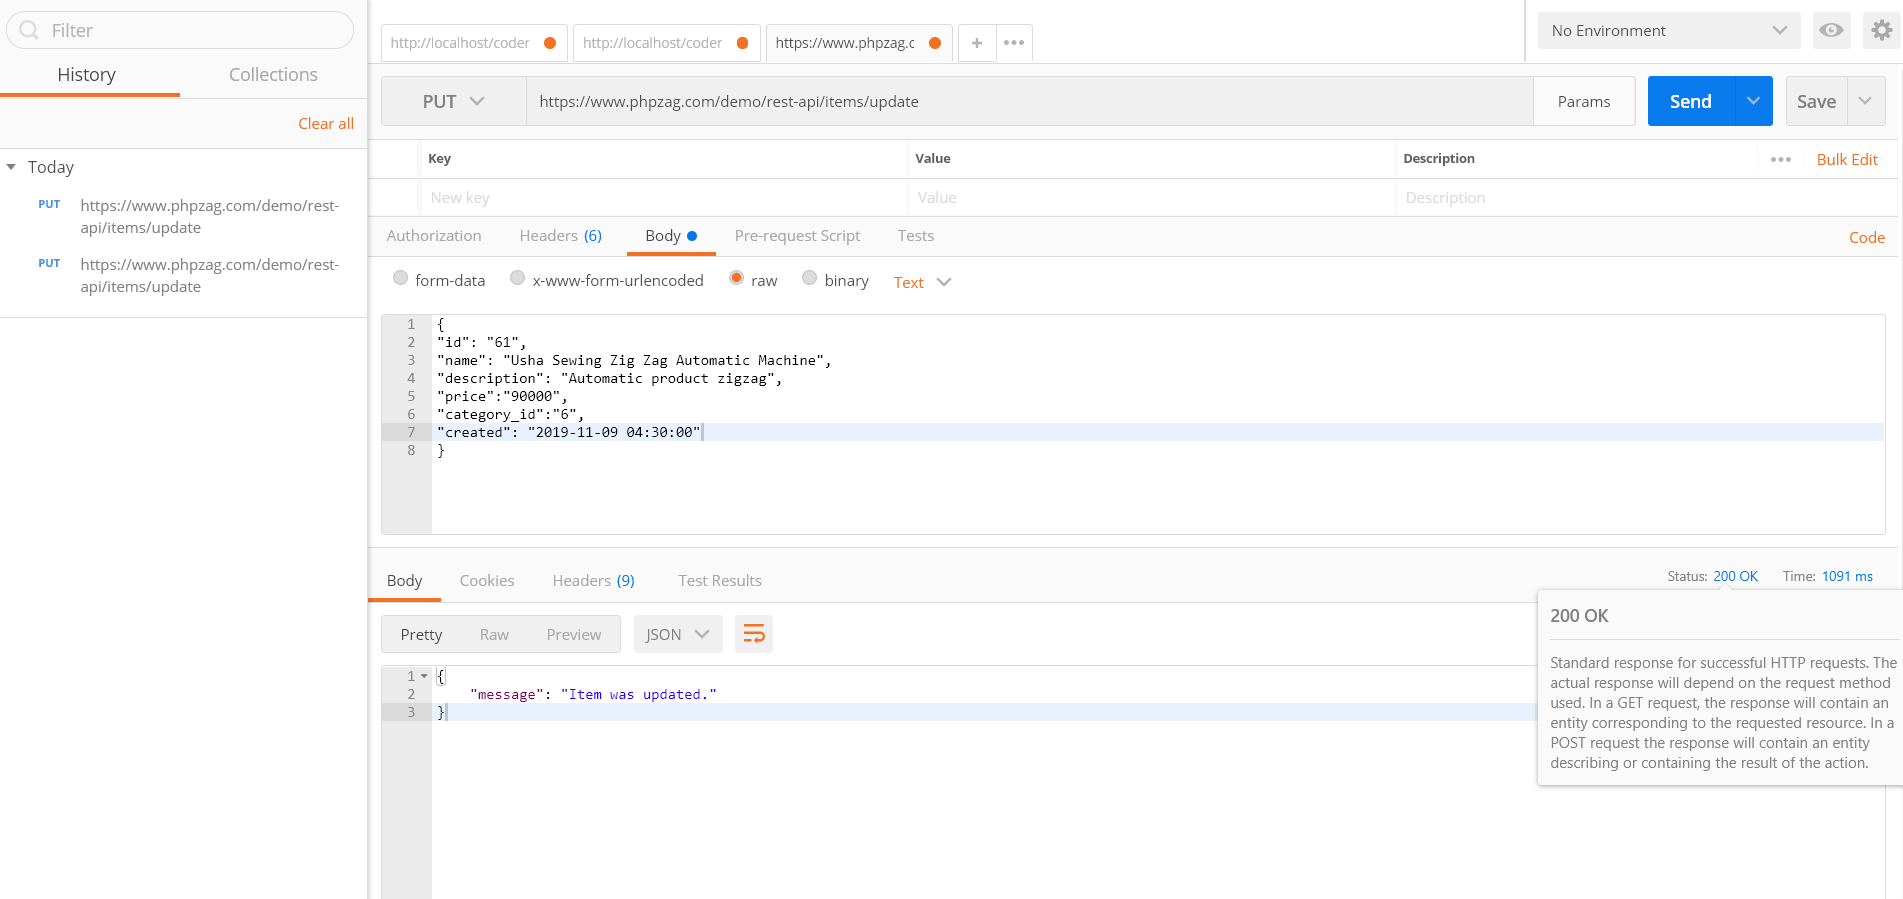
We will test the Update URL example from our REST API using following URL with POSTMAN App.
https://www.phpzag.com/demo/rest-api/items/update
We will PUT the following JSON data values with item id update existing item record. Here we are passing item id 61 to update the record.
{
"id": "61",
"name": "Usha Sewing Automatic Machine",
"description": "its best machine",
"price":"90000",
"category_id":"6",
"created": "2019-11-09 04:30:00"
}
Step6: Implement Delete Items
In directory items, we will create a PHP file delete.php to implement items delete functionality. We will create object of class Items.php and call method delete() to delete items.
<?php
header("Access-Control-Allow-Origin: *");
header("Content-Type: application/json; charset=UTF-8");
header("Access-Control-Allow-Methods: POST");
header("Access-Control-Max-Age: 3600");
header("Access-Control-Allow-Headers: Content-Type, Access-Control-Allow-Headers, Authorization, X-Requested-With");

include_once '../config/Database.php';
include_once '../class/Items.php';

$database = new Database();
$db = $database->getConnection();

$items = new Items($db);

$data = json_decode(file_get_contents("php://input"));

if(!empty($data->id)) {
	$items->id = $data->id;
	if($items->delete()){
		http_response_code(200);
		echo json_encode(array("message" => "Item was deleted."));
	} else {
		http_response_code(503);
		echo json_encode(array("message" => "Unable to delete item."));
	}
} else {
	http_response_code(400);
    echo json_encode(array("message" => "Unable to delete items. Data is incomplete."));
}
?>
In class Items.php, we will implement method delete() to delete items.
<?php
function delete(){

	$stmt = $this->conn->prepare("
		DELETE FROM ".$this->itemsTable."
		WHERE id = ?");

	$this->id = htmlspecialchars(strip_tags($this->id));

	$stmt->bind_param("i", $this->id);

	if($stmt->execute()){
		return true;
	}

	return false;
}
?>
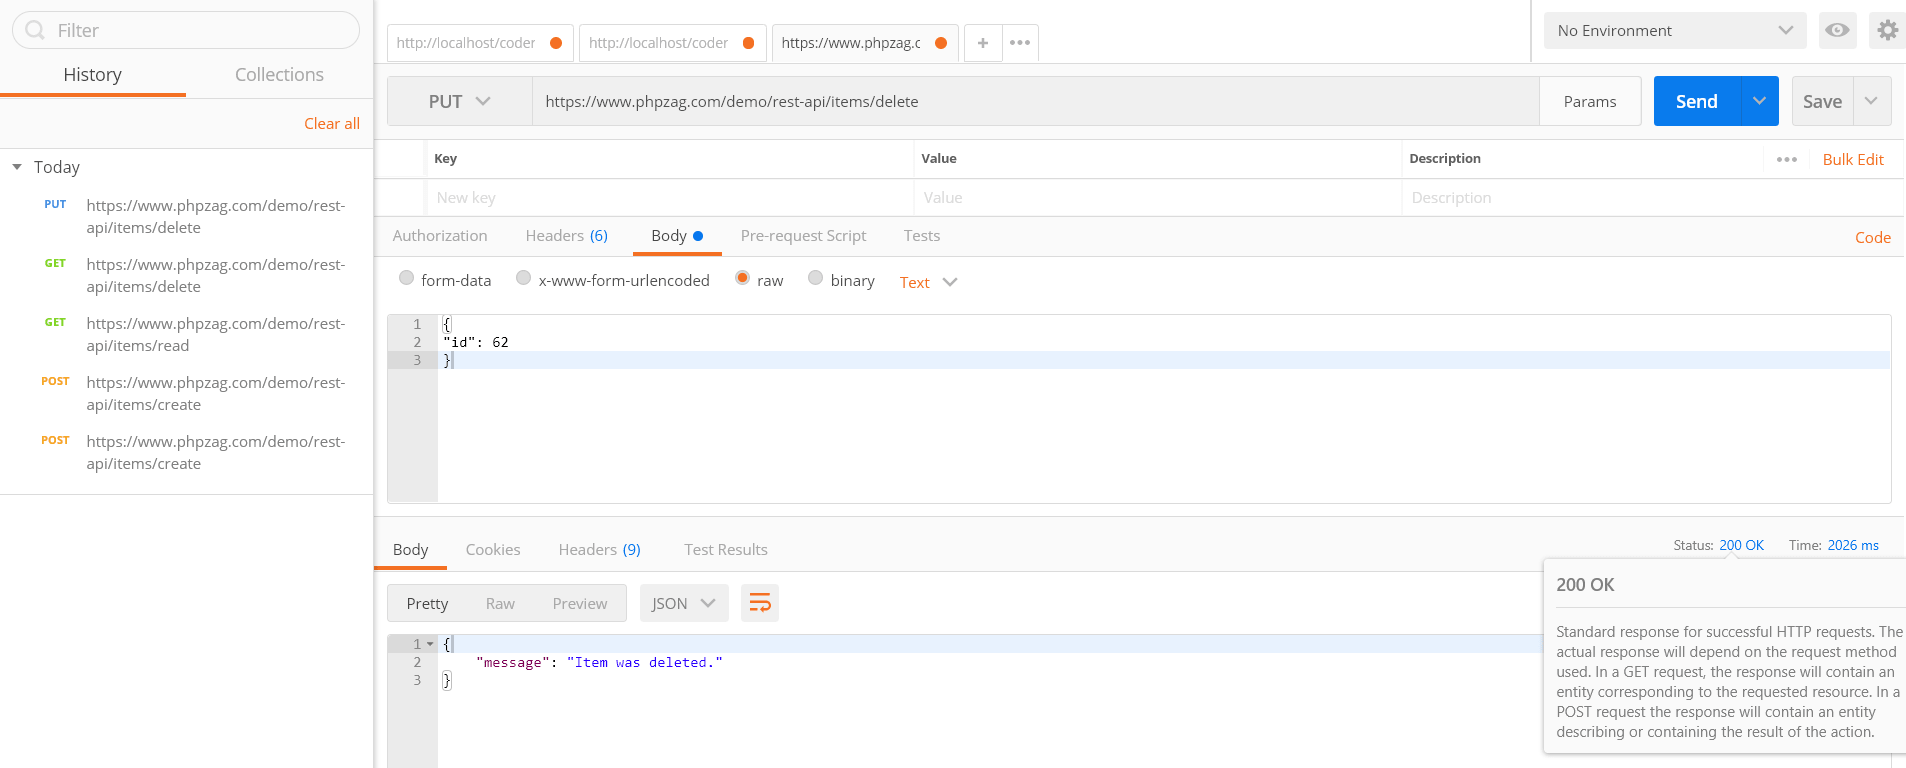
We will test the Delete URL example from our REST API using following URL with POSTMAN App.
https://www.phpzag.com/demo/rest-api/items/delete
We will PUT the following JSON data values with item id to delete item record. Here we are passing item id 61 to update the record.
{
"id": 61
}
Step7: Make SEO Friendly Request URLs of REST API
In directory items, we will create a HTACCESS file .htaccess to make SEO friendly URLs.
RewriteEngine On    # Turn on the rewriting engine
RewriteRule ^read$ read.php [NC,L]
RewriteRule ^read/([0-9_-]*)$ read.php?id=$1 [NC,L]
RewriteRule ^create$ create.php [NC,L]
RewriteRule ^update$ update.php [NC,L]
RewriteRule ^delete$ delete.php [NC,L]
You may also like:
- Library Management System with PHP & MySQL
- Online Food Ordering System with PHP & MySQL
- Build Hotel Reservation System with PHP & MySQL
- Build Live Chat System with Ajax, PHP & MySQL
- Create Event Calendar with jQuery, PHP and MySQL
- Build Invoice System with PHP & MySQL
- Push Notification System with PHP & MySQL
- Create Bootstrap Cards with PHP and MySQL
- Build Content Management System with PHP & MySQL
- Convert Unix Timestamp To Readable Date Time in PHP
- Ajax Drop Down Selection Data Load with PHP & MySQL
- Inventory Management System with Ajax, PHP & MySQL
- Drag and Drop File Upload using jQuery and PHP
- Load Dynamic Content in Bootstrap Popover with Ajax, PHP & MySQL
You can view the live demo from the Demo link and can download the script from the Download link below.
Demo Download
Nice This Helpfully website…
Thanks for this post. I want to make an app, am using intel xdk Cordova, which is a native but don’t want it to be static rather dynamic. Can I use API to pull out information from the Database?
I am using PHP and MySQL. Want my mobile app to get information from the database instead of just normal html, css, js.
Yes, you can create REST API and then call that to display dynamic data. Thanks!
Thanks for this post. i want to make restful API using post not get. In this API will hit the post method not get method.
I will use this API to get the information of the user from the database.
thanks ,
This is helpful for me.
How to insert the data into database using this code can you please suggest any solution. I need to insert name, price, description,category_id. Can you please suggest any solution
You need to write your own insert code to insert data into your database by reading from REST API. Thanks!
Hi Laeeq, i found your tutorial quite helpful.
Thanks!
Very Good! thanks.
Very Good! thanks.
Please Send me script.
You can download the script from download link, exist at the end of tutorial. thanks!
The .zip file has been deleted by you.Please add new .zip file.
Fixed, now you can download the zip file. Thanks!
Thanks You Very Much!
You’re welcome, thanks!
Download doesn’t work.. I got this error “Oops! That page can’t be found.”. Thanks..
Fixed, now you can download the zip file. Thanks!
The .zip file has been deleted by you.Please add new .zip file.
Fixed, now you can download the zip file. Thanks!
Thankz zag. you save me
The only CRUD that works for me is the Read. When I download the file or run the demo I receive: https://www.phpzag.com/demo/rest-api/items/delete.php?id=1
{“message”:”Unable to delete items. Data is incomplete.”} for the commands.
May be id 1 not exist to delete that item. You can create data to delete. Thanks!
Your tutorial is very helpful. Thanks
Awesome tutorial, really saved me!! This has taught me so much, thanks for making the instructions so clear and simple. Keep up the great work!
You’re welcome, thanks!
This really helpful.
Thank you
You’re welcome, thanks!
Hello Thanks for this helpful tutorial this what i wanted exactly .
I got stuck somewhere :-
On your url (www.phpzag.com/demo/rest-api/items/read) there is no .php extension,
But in my pc to run it require .php extension. What should i do so that do not include php extension
I have already given .htaccess file code in tutorial that you need to placed where your php files exist. thanks!
Good afternoon. What should I do if I need to update several JSON array records at the same time?
You need to implement this to handle array of json records with lopps to update. thanks!