In our previous tutorial, we have explained how to Build Comment System with Ajax, PHP & MySQL. In this tutorial, we will explain How To Make Build Content Management System with PHP & MySQL.
A content management system (CMS) is a web application which is used to manage contents with operations such as create, edit and delete content by different users to display to end users. Most of the companies using content management systems in their websites to publish content related to their business.
As there are a ton of great open source CMS available on the internet to power a website (WordPress, Drupal etc.). But it’s still interesting to develop your own CMS to use with your Websites.
Also, read:
- Build Invoice System with PHP & MySQL
- Build Live Chat System with Ajax, PHP & MySQL
- Build Comment System with Ajax, PHP & MySQL
So if you’re running a website and thinking about developing your own content management system. Then you’re here at the right place. In this tutorial you will learn how to develop your own Content Management System with PHP & MySQL.
We will cover the tutorial step by step to create live demo of CMS (front end and admin end). You can check the demo link at the end of the tutorial. The demo is read only due to some security reason. You can download the source code to run the complete project on your server.
CMS feature list
The main goal of the content management system is to manage content at the admin end and display at the front end to the end. So we will develop both the admin and front end section cover most the feature of a CMS.
Front end:
- Home Page with articles listing
- View article page with detailed content
Admin end:
- Admin section user login and logout
- List Users
- Manage users to add, edit and delete with role assign as Admin or Author
- List Articles
- Manage articles to add, edit and delete with status change
- List Categories
- Manage categories to add, edit and delete
Now let’s proceed to develop the content management system (CMS). We will have following file structure for this project.
- content-management-system-php-mysql-demo
- config
- Database.php
- class
- Articles.php
- css
- style.css
- index.php
- view.php
- admin
- class
- User.php
- Category.php
- Post.php
- js
- users.js
- categoires.js
- posts.js
- css
- style.css
- login.php
- dashboard.php
- users.php
- posts.php
- category.php
- class
- config
Implement CMS Front-End Section
As there are both front-end and back-end section needs to be implemented. So first we will handle functionality to display articles at the front end.
Step1: Create MySQL Database and Tables
First we will create MySQL and tables to use with the content management system. We needs to store posts data into table, so we will create cms_user table using following table create query.
CREATE TABLE `cms_user` (
  `id` int(11) NOT NULL,
  `first_name` varchar(50) NOT NULL,
  `last_name` varchar(50) NOT NULL,
  `email` varchar(50) NOT NULL,
  `password` varchar(50) NOT NULL,
  `type` int(11) NOT NULL,
  `deleted` int(11) NOT NULL DEFAULT 0
) ENGINE=InnoDB DEFAULT CHARSET=latin1;
We will create table cms_category to store categories details.
CREATE TABLE `cms_category` (
  `id` int(11) NOT NULL,
  `name` varchar(100) NOT NULL
) ENGINE=InnoDB DEFAULT CHARSET=latin1;
We will also create table cms_posts to store posts details.
CREATE TABLE `cms_posts` (
  `id` int(11) NOT NULL,
  `title` text NOT NULL,
  `message` text NOT NULL,
  `category_id` int(11) NOT NULL,
  `userid` int(11) NOT NULL,
  `status` enum('published','draft','archived','') NOT NULL DEFAULT 'published',
  `created` datetime NOT NULL,
  `updated` datetime NOT NULL DEFAULT current_timestamp()
) ENGINE=InnoDB DEFAULT CHARSET=latin1;
Step2: Make Database Connection
In Database.php class, we will create a function getConnection() to make connection to the database.
class Database{

	private $host  = 'localhost';
    private $user  = 'root';
    private $password   = "";
    private $database  = "phpzag_demo";

    public function getConnection(){
		$conn = new mysqli($this->host, $this->user, $this->password, $this->database);
		if($conn->connect_error){
			die("Error failed to connect to MySQL: " . $conn->connect_error);
		} else {
			return $conn;
		}
    }
}
Step3: Create Articles Class
We will create Articles.php class to get posts data to display at the front end. We will create function getArticles() to get the posts details and result.
public function getArticles(){

	$query = '';
	if($this->id) {
		$query = " AND p.id ='".$this->id."'";
	}
	$sqlQuery = "
		SELECT p.id, p.title, p.message, p.category_id, u.first_name,
u.last_name, p.status, p.created, p.updated, c.name as category
		FROM ".$this->postTable." p
		LEFT JOIN ".$this->categoryTable." c ON c.id = p.category_id
		LEFT JOIN ".$this->userTable." u ON u.id = p.userid
		WHERE p.status ='published' $query ORDER BY p.id DESC";

	$stmt = $this->conn->prepare($sqlQuery);
	$stmt->execute();
	$result = $stmt->get_result();
	return $result;
}
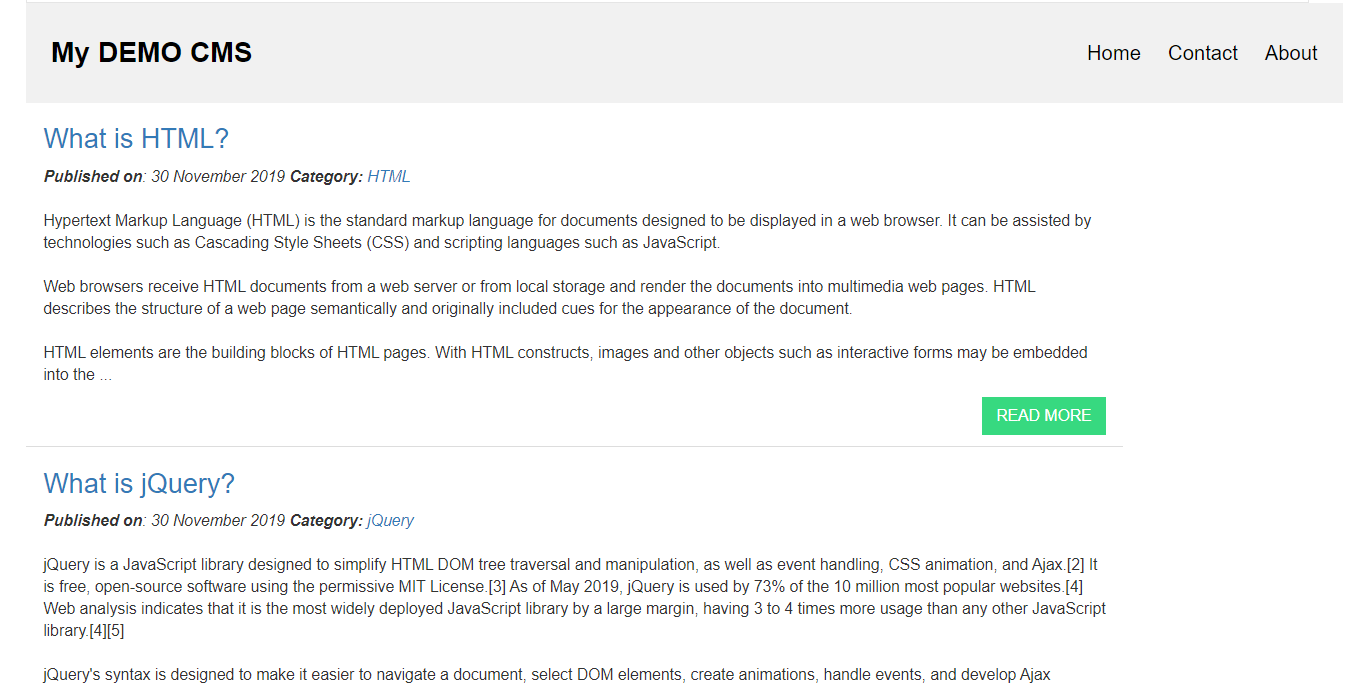
Step4: Display Articles Listing
In index.php file, we will create the object Articles.php class and call the getArticles() method and get the result.
include_once 'config/Database.php';
include_once 'class/Articles.php';

$database = new Database();
$db = $database->getConnection();

$article = new Articles($db);
$result = $article->getArticles();
we will loop through the articles result and display articles listing with article create date, article category and article message. We will display only first 100 word from article with read more button to display full article when click read more.
<div id="blog" class="row">
	<?php
	while ($post = $result->fetch_assoc()) {
		$date = date_create($post['created']);
		$message = str_replace("\n\r", "<br><br>", $post['message']);
		$message = $article->formatMessage($message, 100);
		?>
		<div class="col-md-10 blogShort">
		<h3><a href="view.php?id=<?php echo $post['id']; ?>
"><?php echo $post['title']; ?></a></h3>
		<em><strong>Published on</strong>:
<?php echo date_format($date, "d F Y");	?></em>
		<em><strong>Category:</strong>
 <a href="#" target="_blank"><?php echo $post['category']; ?></a></em>
		<br><br>
		<article>
		<p><?php echo $message; ?> 	</p>
		</article>
		<a class="btn btn-blog pull-right"
href="view.php?id=<?php echo $post['id']; ?>
">READ MORE</a>
		</div>
	<?php } ?>
</div>
Step5: View Article Details
In view.php file, we will implement functionality to get full article details and display .
<?php
while ($post = $result->fetch_assoc()) {
	$date = date_create($post['created']);
	$message = str_replace("\n\r", "<br><br>", $post['message']);
?>
	<div class="col-md-10 blogShort">
	<h2><?php echo $post['title']; ?></h2>
	<em><strong>Published on</strong>: <
?php echo date_format($date, "d F Y");	?></em>
	<em><strong>Category:</strong> <a href="#"
target="_blank"><?php echo $post['category']; ?></a></em>
	<br><br>
	<article>
		<p><?php echo $message; ?> 	</p>
	</article>
	</div>
<?php } ?>
Implement Back-End Section
We will implement CMS back end section with user login to manage users, categories and posts or articles.
Step5: Implement User Login
First we will create HTML login Form to allow admin section access to logged in users.
<div class="col-md-6">
	<div class="panel panel-info">
		<div class="panel-heading" style="background:#00796B;color:white;">
			<div class="panel-title">Admin In</div>
		</div>
		<div style="padding-top:30px" class="panel-body" >
			<?php if ($loginMessage != '') { ?>
				<div id="login-alert"
class="alert alert-danger col-sm-12"><?php echo $loginMessage; ?></div>
			<?php } ?>
			<form id="loginform" class="form-horizontal"
role="form" method="POST" action="">
				<div style="margin-bottom: 25px"
class="input-group">
					<span class="input-group-addon"><i
class="glyphicon glyphicon-user"></i></span>
					<input type="text"
class="form-control" id="email" name="email" placeholder="email"
style="background:white;" required>
				</div>
				<div style="margin-bottom: 25px"
class="input-group">
					<span class="input-group-addon"><i
class="glyphicon glyphicon-lock"></i></span>
					<input type="password" c
lass="form-control" id="password" name="password"placeholder="password" required>
				</div>
				<div style="margin-top:10px" class="form-group">
					<div class="col-sm-12 controls">
					  <input type="submit"
 name="login" value="Login" class="btn btn-info">
					</div>
				</div>
				<div style="margin-top:10px" class="form-group">
					<div class="col-sm-12 controls">
					User: admin@phpzag.com<br>
					password:123
					</div>
				</div>
			</form>
		</div>
	</div>
</div>
We will handle user login functionality by calling user method login() and redirect to Dashboard if successful login.
include_once 'config/Database.php';
include_once 'class/User.php';

$database = new Database();
$db = $database->getConnection();

$user = new User($db);

$loginMessage = '';
if(!empty($_POST["login"]) && $_POST["email"]!=''&& $_POST["password"]!='') {
	$user->email = $_POST["email"];
	$user->password = $_POST["password"];
	if($user->login()) {
		header("location: dashboard.php");
	} else {
		$loginMessage = 'Invalid login! Please try again.';
	}
}
Step6: Manage Users
In this section, we will handle functionality to create new user, edit details and delete user. In users.php file, we will display list of user with add, edit and delete buttons.
<section id="main">
<div class="container">
<div class="row">
<?php include "left_menus.php"; ?>
<div class="col-md-9">
<div class="panel panel-default">
<div class="panel-heading"style="background-color:  #095f59;>
<h3 class="panel-title">Latest Users</h3>
</div>
<div class="panel-body">
<div class="panel-heading">
<div class="row">
<div class="col-md-10">
<h3 class="panel-title"></h3>
</div>
<div class="col-md-2" align="right">
<a href="add_users.php" class="btn btn-default btn-xs">Add New</a>
</div>
</div>
</div>
<table id="userList" class="table table-bordered table-striped">
<thead>
<tr>
<th>Name</th>
<th>Email</th>
<th>Type</th>
<th>Status</th>
<th></th>
<th></th>
</tr>
</thead>
</table>
</div>
</div>
</div>
</div>
</div>
</section>
We will make ajax request with action userListing to load user listing into datatables.
var usersData = $('#userList').DataTable({
	"lengthChange": false,
	"processing":true,
	"serverSide":true,
	"order":[],
	"ajax":{
		url:"manage_user.php",
		type:"POST",
		data:{action:'userListing'},
		dataType:"json"
	},
	"columnDefs":[
		{
			"targets":[0, 4, 5],
			"orderable":false,
		},
	],
	"pageLength": 10
});
We will implement to get user listing from MySQL database table. We will call user method getUsersListing() and JSON response to load users list into Datatables.
public function getUsersListing(){

	$whereQuery = '';
	if($_SESSION['user_type'] == 2) {
		$whereQuery = "WHERE id ='".$_SESSION['userid']."'";
	}

	$sqlQuery = "
		SELECT id, first_name, last_name, email, type, deleted
		FROM ".$this->userTable."
		$whereQuery ";

	if(!empty($_POST["search"]["value"])){
		$sqlQuery .= ' first_name LIKE "%'.$_POST["search"]["value"].'%" ';
		$sqlQuery .= ' OR last_name LIKE "%'.$_POST["search"]["value"].'%" ';
		$sqlQuery .= ' OR email LIKE "%'.$_POST["search"]["value"].'%" ';
		$sqlQuery .= ' OR type LIKE "%'.$_POST["search"]["value"].'%" ';
	}
	if(!empty($_POST["order"])){
		$sqlQuery .= 'ORDER BY '.$_POST['order']['0']['column'].'
'.$_POST['order']['0']['dir'].' ';
	} else {
		$sqlQuery .= 'ORDER BY id DESC ';
	}
	if($_POST["length"] != -1){
		$sqlQuery .= 'LIMIT ' . $_POST['start'] . ', ' . $_POST['length'];
	}

	$stmt = $this->conn->prepare($sqlQuery);
	$stmt->execute();
	$result = $stmt->get_result();

	$stmtTotal = $this->conn->prepare("SELECT * FROM ".$this->userTable);
	$stmtTotal->execute();
	$allResult = $stmtTotal->get_result();
	$allRecords = $allResult->num_rows;


	$displayRecords = $result->num_rows;
	$users = array();
	while ($user = $result->fetch_assoc()) {
		$rows = array();
		$status = '';
		if($user['deleted'])	{
			$status = '<span class="label
label-danger">Inactive</span>';
		} else {
			$status = '<span class="label
label-success">Active</span>';
		}

		$type = '';
		if($user['type'] == 1){
			$type = '<span class="label label-danger">Admin</span>';
		} else if($user['type'] == 2){
			$type = '<span class="label label-warning">Author</span>';
		}

		$rows[] = ucfirst($user['first_name'])." ".$user['last_name'];
		$rows[] = $user['email'];
		$rows[] = $type;
		$rows[] = $status;
		$rows[] = '<a href="add_users.php?id='.$user["id"].'"
class="btn btn-warning btn-xs
update">Edit</a>';
		$rows[] = '<button type="button" name="delete"
id="'.$user["id"].'"
 class="btn btn-danger btn-xs delete"
 >Delete</button>';
		$users[] = $rows;
	}

	$output = array(
		"draw"	=>	intval($_POST["draw"]),
		"iTotalRecords"	=> 	$displayRecords,
		"iTotalDisplayRecords"	=>  $allRecords,
		"data"	=> 	$users
	);

	echo json_encode($output);
}
Step7: Manage Categories
In this section, we will handle functionality to create new categories, edit and delete categories. In categories.php file, we will display categories listing with add, edit and delete buttons.
<div class="panel-body">
	<div class="panel-heading">
		<div class="row">
			<div class="col-md-10">
				<h3 class="panel-title"></h3>
			</div>
			<div class="col-md-2" align="right">
				<a href="add_categories.php"
class="btn btn-default btn-xs">Add New</a>
			</div>
		</div>
	</div>
We will make ajax request to manage_categories.php with action categoryListing to load categories.
var categoryData = $('#categoryList').DataTable({
	"lengthChange": false,
	"processing":true,
	"serverSide":true,
	"order":[],
	"ajax":{
		url:"manage_categories.php",
		type:"POST",
		data:{action:'categoryListing'},
		dataType:"json"
	},
	"columnDefs":[
		{
			"targets":[0, 2, 3],
			"orderable":false,
		},
	],
	"pageLength": 10
});
We will call category method getCategoryListing() and list categories.
public function getCategoryListing(){

	$sqlQuery = "
		SELECT id, name
		FROM ".$this->categoryTable."
		 ";

	if(!empty($_POST["search"]["value"])){
		$sqlQuery .= ' name LIKE "%'.$_POST["search"]["value"].'%" ';
	}

	if(!empty($_POST["order"])){
		$sqlQuery .= 'ORDER
BY '.$_POST['order']['0']['column'].' '.$_POST['order']['0']['dir'].' ';
	} else {
		$sqlQuery .= 'ORDER BY id DESC ';
	}
	if($_POST["length"] != -1){
		$sqlQuery .= 'LIMIT ' . $_POST['start'] . ', ' . $_POST['length'];
	}

	$stmt = $this->conn->prepare($sqlQuery);
	$stmt->execute();
	$result = $stmt->get_result();

	$stmtTotal = $this->conn->prepare("SELECT *
FROM ".$this->categoryTable);
	$stmtTotal->execute();
	$allResult = $stmtTotal->get_result();
	$allRecords = $allResult->num_rows;

	$displayRecords = $result->num_rows;
	$categories = array();
	while ($category = $result->fetch_assoc()) {
		$rows = array();
		$rows[] = $category['id'];
		$rows[] = $category['name'];
		$rows[] = '<a href="add_categories.php?id='.$category["id"].'"
class="btn btn-warning btn-xs
update">Edit</a>';
		$rows[] = '<button type="button"
name="delete"
id="'.$category["id"].'"
class="btn btn-danger btn-xs
delete" >Delete</button>';
		$categories[] = $rows;
	}

	$output = array(
		"draw"	=>	intval($_POST["draw"]),
		"iTotalRecords"	=> 	$displayRecords,
		"iTotalDisplayRecords"	=>  $allRecords,
		"data"	=> 	$categories
	);

	echo json_encode($output);
}
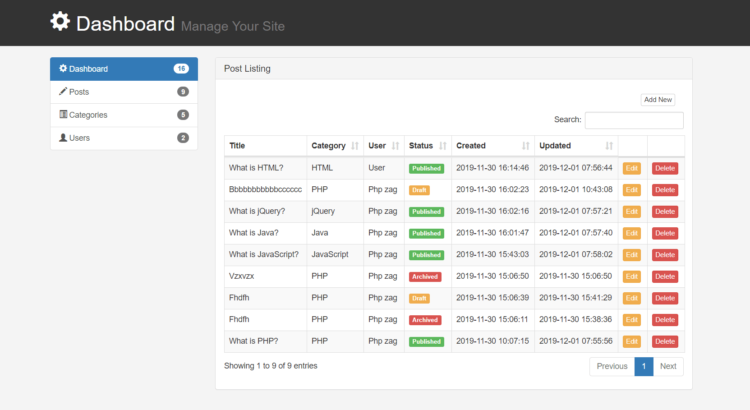
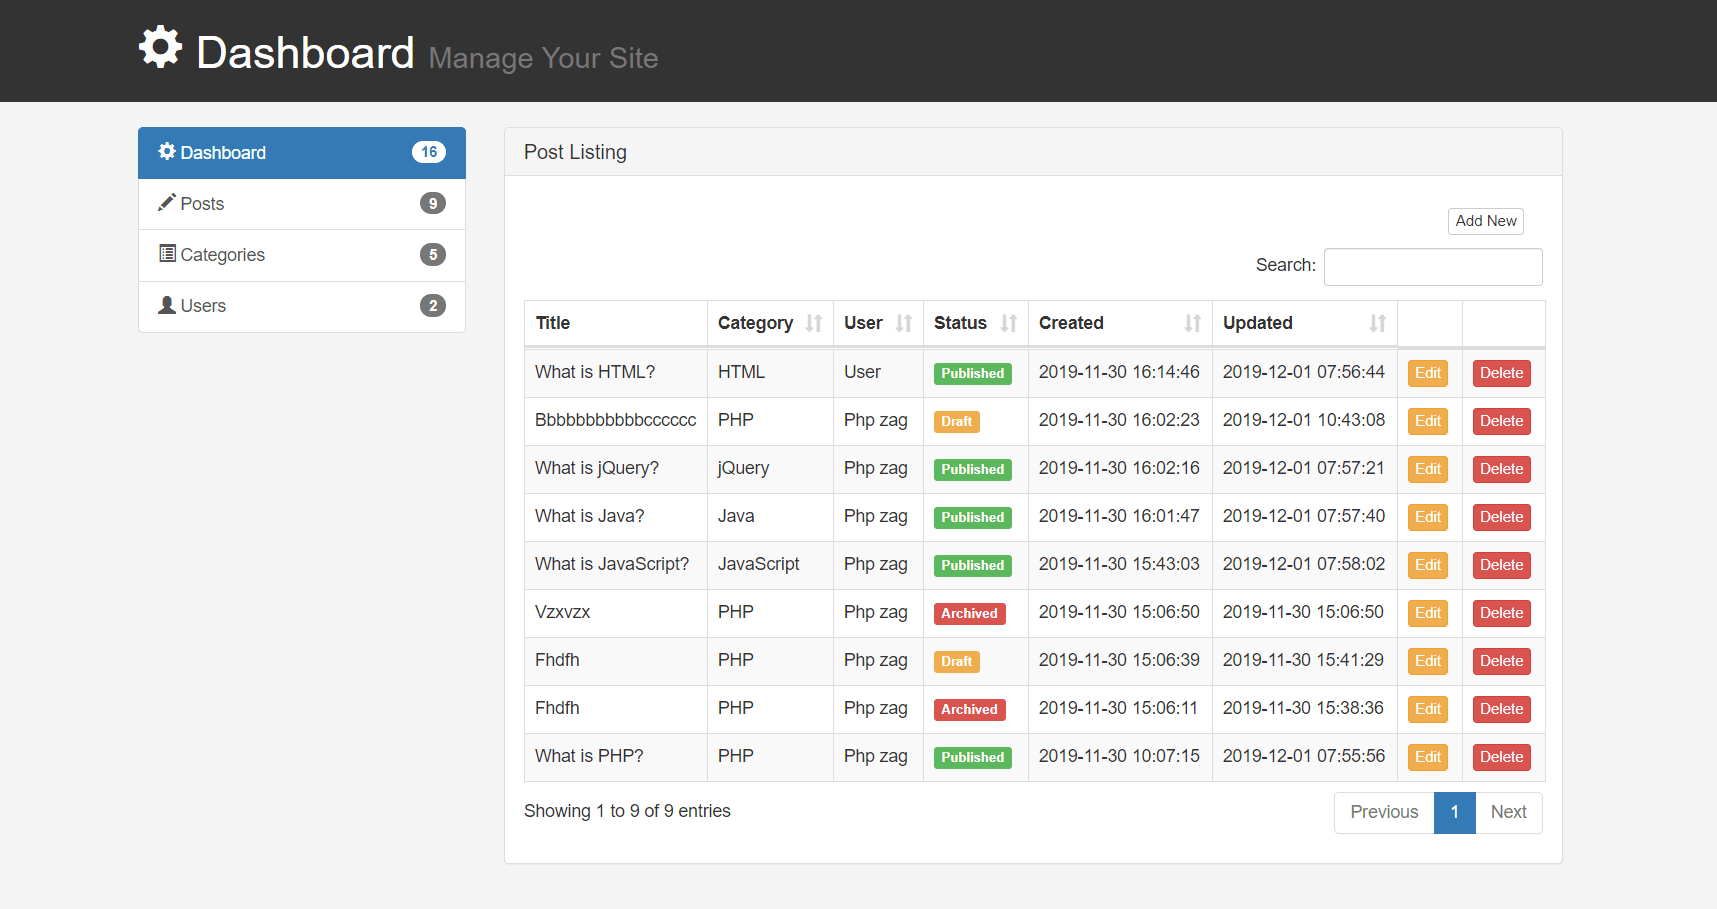
Step8: Manage Posts
In this section, we will handle functionality to create new posts, edit posts and delete posts. We will display posts list in
<section id="main">
<div class="container">
<div class="row">
<?php include "left_menus.php"; ?>
<div class="col-md-9">
<div class="panel panel-default">
<div class="panel-heading">
<h3 class="panel-title">Post Listing</h3>
</div>
<div class="panel-body">
<div class="panel-heading">
<div class="row">
<div class="col-md-10">
<h3 class="panel-title"></h3>
</div>
<div class="col-md-2" align="right">
<a href="compose_post.php"
class="btn btn-default btn-xs">Add New</a>
</div>
</div>
</div>
<table id="postsList" class="table table-bordered table-striped">
<thead>
<tr>
<th>Title</th>
<th>Category</th>
<th>User</th>
<th>Status</th>
<th>Created</th>
<th>Updated</th>
<th></th>
<th></th>
</tr>
</thead>
</table>
</div>
</div>
</div>
</div>
</div>
</section>
We will make ajax request to manage_posts.php with action postListing to get posts.
var postsData = $('#postsList').DataTable({
	"lengthChange": false,
	"processing":true,
	"serverSide":true,
	"order":[],
	"ajax":{
		url:"manage_posts.php",
		type:"POST",
		data:{action:'postListing'},
		dataType:"json"
	},
	"columnDefs":[
		{
			"targets":[0, 6, 7],
			"orderable":false,
		},
	],
	"pageLength": 10
});
We will call post method getPostsListing() to post details for listing.
public function getPostsListing(){

	$whereQuery = '';
	if($_SESSION['user_type'] == 2) {
		$whereQuery = "WHERE p.userid ='".$_SESSION['userid']."'";
	}

	$sqlQuery = "
		SELECT p.id, p.title, p.category_id, u.first_name, u.last_name,
p.status, p.created, p.updated, c.name
		FROM ".$this->postTable." p
		LEFT JOIN ".$this->categoryTable." c ON c.id = p.category_id
		LEFT JOIN ".$this->userTable." u ON u.id = p.userid
		$whereQuery";

	if(!empty($_POST["search"]["value"])){
		$sqlQuery .= ' title LIKE "%'.$_POST["search"]["value"].'%" ';
		$sqlQuery .= ' OR message LIKE "%'.$_POST["search"]["value"].'%" ';
		$sqlQuery .= ' OR created LIKE "%'.$_POST["search"]["value"].'%" ';
		$sqlQuery .= ' OR updated LIKE "%'.$_POST["search"]["value"].'%" ';
	}
	if(!empty($_POST["order"])){
		$sqlQuery .= 'ORDER BY '.$_POST['order']['0']['column'].'
 '.$_POST['order']['0']['dir'].' ';
	} else {
		$sqlQuery .= 'ORDER BY id DESC ';
	}
	if($_POST["length"] != -1){
		$sqlQuery .= 'LIMIT ' . $_POST['start'] . ', ' . $_POST['length'];
	}

	$stmt = $this->conn->prepare($sqlQuery);
	$stmt->execute();
	$result = $stmt->get_result();

	$stmtTotal = $this->conn->prepare("SELECT *
FROM ".$this->postTable);
	$stmtTotal->execute();
	$allResult = $stmtTotal->get_result();
	$allRecords = $allResult->num_rows;


	$displayRecords = $result->num_rows;
	$posts = array();
	while ($post = $result->fetch_assoc()) {
		$rows = array();
		$status = '';
		if($post['status'] == 'published')	{
			$status = '<span class="label
label-success">Published</span>';
		} else if($post['status'] == 'draft') {
			$status = '<span class="label
label-warning">Draft</span>';
		} else if($post['status'] == 'archived') {
			$status = '<span class="label
 label-danger">Archived</span>';
		}

		$rows[] = ucfirst($post['title']);
		$rows[] = $post['name'];
		$rows[] = ucfirst($post['first_name'])." ".$post['last_name'];
		$rows[] = $status;
		$rows[] = $post['created'];
		$rows[] = $post['updated'];
		$rows[] = '<a href="compose_post.php?id='.$post["id"].'"
class="btn btn-warning btn-xs
update">Edit</a>';
		$rows[] = '<button type="button"
name="delete" id="'.$post["id"].'"
 class="btn btn-danger btn-xs
delete" >Delete</button>';
		$posts[] = $rows;
	}

	$output = array(
		"draw"	=>	intval($_POST["draw"]),
		"iTotalRecords"	=> 	$displayRecords,
		"iTotalDisplayRecords"	=>  $allRecords,
		"data"	=> 	$posts
	);

	echo json_encode($output);
}
In this tutorial, we have briefly explained code and functionality for both the Front-end and Back-end. For complete code, you can download the project ZIP file with database details to run on your server.
You will also like these tutorials:
- Star Rating System with Ajax, PHP and MySQL
- Create Event Calendar with jQuery, PHP and MySQL
- Build Your Own CAPTCHA Script with PHP
- Convert Unix Timestamp To Readable Date Time in PHP
- Ajax Drop Down Selection Data Load with PHP & MySQL
- Inventory Management System with Ajax, PHP & MySQL
- Drag and Drop File Upload using jQuery and PHP
- Create Live Editable Table with jQuery, PHP and MySQL
- Live Add Edit Delete datatables Records with Ajax, PHP and MySQL
- Stripe Payment Gateway Integration in PHP
- Export Data to Excel with PHP and MySQL
- Star Rating System with Ajax, PHP and MySQL
- Create Dynamic Bootstrap Tabs with PHP & MySQL
- How To Create Simple REST API in PHP
You can view the live demo from the Demo link and can download the script from the Download link below.
Front DemoAdmin Download
Hi Thank you for this great creativity and effort. I have tried more than one of your projects, but in this project I have faced the problem of connecting to the database c / xamp / hotds / php / system_control_address_config / database.php / And the error in the tenth line conn $ I renamed the database but had no experience with cms systems. Thank you
What’s error is returning, can you send error details please to fix the issue. thanks!
Make you cms that could add post along with images
I will try to update with same. Thanks!
Very useful in many projects. Thank you for sharing!
you’re welcome, thanks!
good day please can you share with the project, i have been trying to download the project but not working even after social media like. thanks
Now there are no social media like, you can download directly. thanks!
how you download php cms system please help me
The download link is at the end of tutorial. thanks!
Used my twitter account to download file, but still not able to unlock the download.
Please try to reload page, it should be display then. thanks!
Firstly – awesome tutorial – thank you! This helps me better understand OOP better since I’m mainly working with Procedural right now.
Quick question – what version of PHP and MySQL are you basing this on? I’m getting some interesting errors (specifically the add/edit user process), but I’m running PHP 7.4.1 and MySQL 8.0.16. I can use any version, just need to know which. Of course, it might just be me! 🙂
Thanks, I am using PHP 7 for this eample. What errors you’re facing, please provide details to fix those. thanks!
Any chance a comments module could be added?
Yes, you can integrate it directly into the code, thanks
Great tutorial but data tables search and filtering not working correctly ;/
I am checking and update you, thanks!
Hey, i have the same problem. Is there already a solution to fix the problem?
Super nice tutorial btw. i find it very useful for a project at my university.
Ok, I am checking and update you, thanks!
please you can add the image upload in an article thank you
Ok, I will try to add this in next update. Thanks!
Thank you for always being there
The category is set up as a link so that if you click on the category after the article has been posted, it should list all articles with that category id. However there is no code to make that happen. How would I do that?
I will update article with details, thanks!
How to list articles by category?
I will update this to list article by category to help all, thanks!
I need your help!
I already upload into my server, I found a problem:
1. When I run index.php > Error:500,
but when I disable = $result = $article->getArticles();
can run, but can’t load article.
2. when I go to Admin, can view the page, but when I click “Login” then > Error:500.
I used PHP 7, need your help
Thank You
Try to debug error by print sql query to know the cause of issue. thanks!
Fatal error: Uncaught Error: Call to a member function execute() on bool in F:\xampp\htdocs\cms-php-mysql-demo\class\Articles.php:27 Stack trace: #0 F:\xampp\htdocs\cms-php-mysql-demo\index.php(11): Articles->getArticles() #1 {main} thrown in F:\xampp\htdocs\cms-php-mysql-demo\class\Articles.php on line 27
Try to debug passed values kin your query, may be there some issue. thanks!
Fixed it by disabling MySQLi driver in cPanel and enabling nd_mysqli
How published, draft, archived coding works when i select archived where is the post go or hidden somewhere.
In case of archive, post is not displayed. you can implement list archived posts as per your need. thanks!
hello thank you for sharing and tutorial this is very informative however I could see a lot of xss php flaw coming from the post we must add htmlspecialchars
yes, you can use that, thanks!
Hi, the system is simple and fantastic, but I have a problem modifying the tables in the dashboard, I think they are in the “jquery.dataTables.min.js” file which unfortunately is not very readable, it is not possible to have the tables directly in php , in the admin / post.php file?
even without filters or research, so you can customize the tables … thanks
you can customize the datatables with their options, you can check datatables doc for this. thanks!
Excellent , thank you for the project. Now let me see how it works
and also how can I make it work. 😀 .
Hope I can understand it :oD
thanks!
Very informative and well-written article.
I am sure this article will be of greater use to many readers like me.
Hi PHPZAG Team,
Great work, good for education, i just wont to tell you when i login on demo in Admin and in post try to search something i get this message.
DataTables warning: table id=postsList – Ajax error. For more information about this error, please see http://datatables.net/tn/7
Is this bug ?
One more time thank you,
May be issue at your end, try to debug if data is returning in response. thanks!
Hi, and thanks for a great CMS tutorial that that is finally up to date. But, is this CMS to much up to date? Nothing is working. All i get when i access the index.php is an ERROR 500 no matter what I do. Does this CMS support, MySQL 5.7.23 and PHP 7.1.33?
This is the error msg. i get:
( ! ) Fatal error: Uncaught Error: Call to undefined method mysqli_stmt::get_result() in /home/W/test/www/class/Articles.php on line 28
Error: Call to undefined method mysqli_stmt::get_result() in /home/W/test/www/class/Articles.php on line 28
Call Stack
# Time Memory Function Location
1 0.0004 407936 {main}( ) …/view.php:0
2 0.0259 418528 Articles->getArticles( ) …/view.php:11
it’s working with current PHP and MySQL versions. Thanks!
Hi, thankyou for amazing code. I have a problem on “Add New” category. When I want to add a new category, on Add/Edit page, It gives the following error on the page. “Warning: Trying to access array offset on value of type null in C:\xampp\htdocs\phpzag\cms\admin\add_categories.php on line 81“. Also same error gives on Add New Article. How can I fix this error? Thank you very much.
May be there issue due to different array key, try to debug and let me know. thanks!
Hello everyone, does anyone have a tip for me on how to implement pagination in an oop environment?
I’m personally really bad in the oop classes. So far I’ve programmed straight ahead without classes, the whole thing would work like this, but I would be interested to see how it should look in this project. I would appreciate any help